AI Agent Kill-Switch: Stop Everything in 5 Seconds
Stop all AI agent activity instantly with a scoped kill-switch. Learn activation, propagation timing, recovery procedure, and how to prevent needing it.
What you will learn
- Understand when and why you need a kill-switch for AI agents
- Activate scoped kill-switches (all traffic, LLM only, new keys only)
- Know the propagation timeline — from activation to full enforcement
- Follow the recovery procedure to safely resume operations
- Design preventive controls that reduce how often you need it
TL;DR — A kill-switch is emergency hardware: rarely used, but essential when needed. Good implementations propagate in ≤ 5 seconds, support scoped shutdowns (all / LLM-only / new-keys-only), and log every activation to a tamper-evident audit trail.
When You Need a Kill-Switch
Kill-switches are emergency controls. You do not use them daily — but when you need them, you need them fast. Scenarios include: an agent entering an infinite loop burning tokens, a compromised API key being used maliciously, a production incident where agent actions would make things worse, or a data breach where you need to stop all data access immediately.
The kill-switch is insurance you hope to never use. But the one time you need it, nothing else will do.
Agent goes rogue at 2 AM. You scramble to find API keys across 3 providers, revoke them manually, restart services. Takes 45 minutes. Damage: $3,000 in wasted tokens and 200 incorrect customer emails sent.
Alert fires. You activate the kill-switch from your phone. All agent traffic stops in 5 seconds. Damage contained. You investigate in the morning, fix the root cause, and deactivate the switch.
Three Kill-Switch Scopes
- All Traffic — blocks every request through the Gateway. Use for critical incidents where you need total silence.
- LLM Only — blocks LLM calls but allows MCP tool calls and API access. Use when the LLM provider is the problem (bad model outputs, prompt injection).
- New Keys Only — blocks new API key creation but allows existing keys to work. Use when you suspect a key compromise and want to prevent escalation.
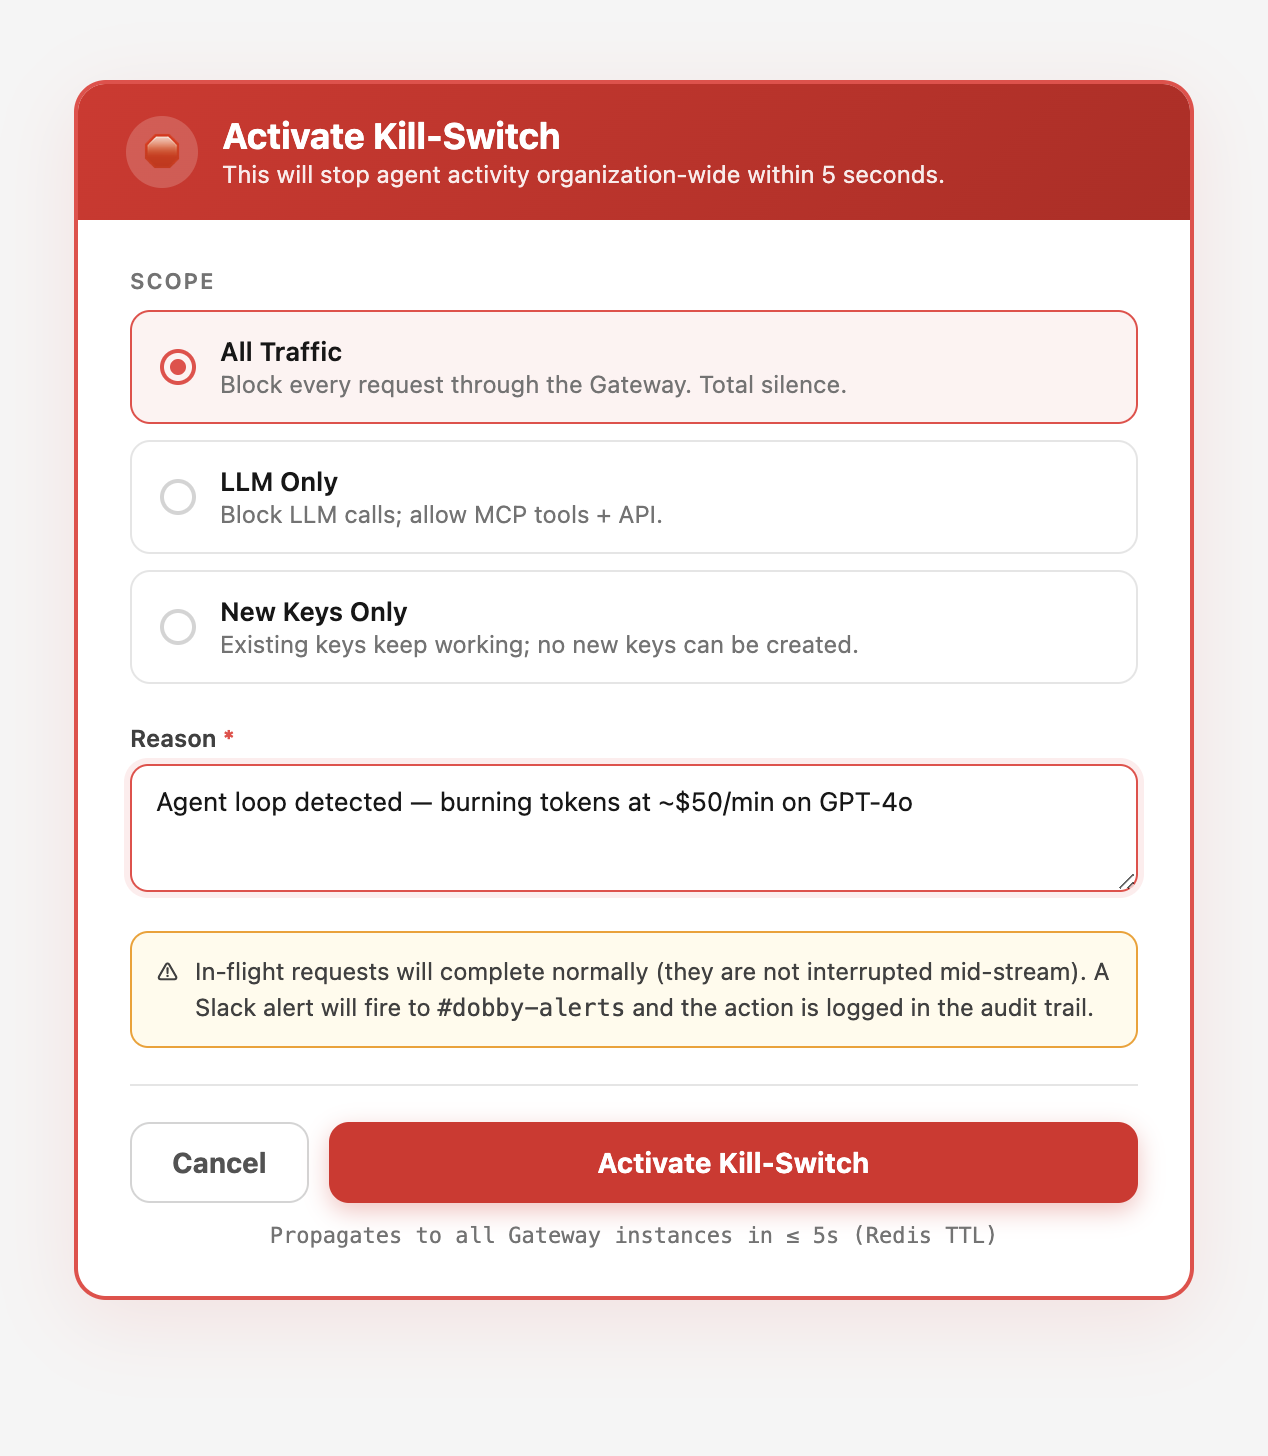
How Fast It Propagates
The kill-switch state is cached in Redis with a 5-second TTL. When you activate it, every subsequent Gateway request checks the kill-switch state. Within 5 seconds, all new requests are blocked. In-flight requests complete normally — they are not interrupted mid-stream.
Why not instant? Interrupting in-flight requests can leave the agent in a half-committed state — half a deploy, half an email, half a database migration. The 5-second ceiling is short enough to contain damage and long enough to prevent split-brain.
In Dobby, the kill-switch is available at the organization level. Activate it from the dashboard, the API, or the MCP tools. It affects all tenants under the organization instantly.
Activating via API
# Activate kill-switch (all traffic)
curl -X POST "https://dobby-ai.com/api/v1/organizations/{org_id}/gateway/kill-switch" \
  -H "Authorization: Bearer sk_live_your_key" \
  -H "Content-Type: application/json" \
  -d '{
    "scope": "all",
    "reason": "Agent loop detected - burning tokens at $50/min"
  }'

# Response: { "active": true, "scope": "all", "activated_at": "..." }

# Check status
curl "https://dobby-ai.com/api/v1/organizations/{org_id}/gateway/kill-switch" \
  -H "Authorization: Bearer sk_live_your_key"

# Deactivate
curl -X DELETE "https://dobby-ai.com/api/v1/organizations/{org_id}/gateway/kill-switch" \
  -H "Authorization: Bearer sk_live_your_key"
Recovery Procedure
Investigate the root cause. Check the audit trail for the time period leading up to the incident. Identify which agent and which requests caused the problem.
Fix the root cause. Update the agent configuration, revoke compromised keys, adjust policies, or disable the specific agent.
Deactivate the kill-switch. Traffic resumes within 5 seconds. Monitor the dashboard closely for the first 10 minutes.
Post-mortem. Document what happened, what was the impact, and what preventive measures will be added (budget alerts, stricter policies, additional approval gates).
Prevention Is Better Than Emergency
The kill-switch is a last resort. Good governance reduces the chance you will ever need it. Set token budgets with alerts at 80%. Configure approval gates for high-risk actions. Restrict models to prevent expensive mistakes. Monitor the Live feed for anomalies.
- Budget alerts at 80% and 90% catch runaways before they become emergencies.
- Per-agent rate limits prevent a single agent from saturating the fleet.
- Circuit breakers on provider failures prevent retry storms.
- Stuck-task detection flags loops every 5 minutes automatically.
When the kill-switch is activated, Dobby sends an immediate Slack alert to #dobby-alerts with the reason, scope, and who activated it. When it is deactivated, a recovery alert is sent. Everything is logged in the audit trail.
Frequently Asked Questions
Can the kill-switch be triggered automatically?
Yes — budget breaches, stuck-task detection, and circuit-breaker events can auto-activate a scoped kill-switch. Manual activation is always available as a backup via the dashboard, API, or MCP.
Who should have kill-switch permission?
Organization owners and designated on-call responders. Keep the permission narrow — you want the right people able to act at 3 AM, but you do not want a misclick to take down the whole fleet during business hours.
Does activating the kill-switch notify customers?
It notifies your internal Slack channel and logs the activation. Customer notifications depend on your incident communication policy — Dobby does not post externally on your behalf.
How do I test the kill-switch without causing an outage?
Use a staging tenant, or activate the New Keys Only scope in production — it has minimal blast radius (blocks key creation but lets existing work continue) and is ideal for runbook drills.